Running low on storage space is one of the most common frustrations Mac users face, especially on models configured with smaller 256GB or 512GB SSDs that fill up faster than expected with system files, application caches, software updates, Time Machine snapshots, and accumulated digital clutter. The mysterious “System Data” category in your Mac storage breakdown often consumes 20GB to 80GB or more, and understanding what comprises this allocation and how to safely reclaim space without damaging your operating system is essential knowledge for every Mac owner. This detailed guide walks you through every proven method to clear system storage on your Mac in 2026.
Table of Contents
What Exactly is System Storage on Mac?
The “System Data” category (previously labeled simply “System” in older macOS versions) is a catch-all classification that encompasses multiple types of files essential for macOS operation plus accumulated temporary data that grows over time. The core macOS operating system files typically occupy 12 to 15GB and cannot be reduced without reinstalling macOS. Beyond the OS itself, System Data includes application caches (temporary files created by apps to speed up repeated operations), system caches (kernel caches, font caches, DYLD shared caches), browser caches and website data, Time Machine local snapshots stored on the internal drive before being transferred to your backup drive, iOS device backups made through Finder, log files generated by system processes and applications, and temporary files from incomplete downloads, failed installations, and interrupted file operations.
The total System Data allocation can vary dramatically between Mac users. A freshly installed macOS system with no additional applications might show 15 to 20GB of system storage, while a Mac that has been used for several years with hundreds of applications installed, multiple iOS device backups stored locally, and accumulated cache files can easily show 60 to 100GB or more in the System Data category. The good news is that a significant portion of this space can be safely reclaimed through the methods described below without any negative impact on system stability or performance.
How to Check Your Mac Storage Usage
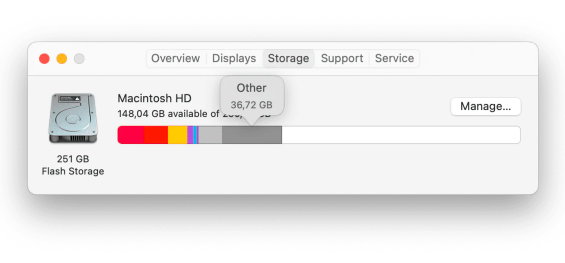
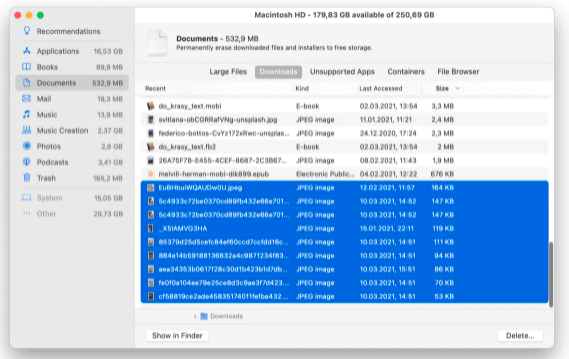
Click the Apple menu in the top-left corner of your screen, select “About This Mac,” then click the “More Info” button, and navigate to Storage in the sidebar (on macOS Ventura and later) or click the Storage tab directly (on older macOS versions). The color-coded bar graph shows exactly how your SSD space is distributed across categories including Applications, Documents, Photos, System Data, macOS, and Other. Click “Manage” to access the built-in Storage Management tool that provides specific recommendations for reclaiming space, including options to Store in iCloud, Optimize Storage, Empty Trash Automatically, and Reduce Clutter by identifying large files you may no longer need.
Method 1: Clear Application and System Cache Files
Cache files represent the largest recoverable portion of System Data on most Macs. To manually clear user-level application caches, open Finder, press Shift + Command + G to open the “Go to Folder” dialog, and type ~/Library/Caches then press Enter. This reveals the cache folders created by every application you have used. You can safely select all folders, move them to the Trash, and empty the Trash. Applications will recreate their cache folders automatically the next time they launch, rebuilding only the cache data they actually need rather than carrying forward years of accumulated stale cache content.
For system-level caches, navigate to /Library/Caches (without the tilde ~) using the same Go to Folder method. System caches require administrator privileges to delete, and you should exercise more caution here, selectively removing caches from applications you recognize rather than deleting everything indiscriminately. After clearing both user and system caches, restart your Mac to allow macOS to rebuild essential system caches cleanly. The total space recovered from cache clearing typically ranges from 2GB to 20GB depending on how long your Mac has been running without maintenance.

Advanced Cleanup: Time Machine Snapshots, Old Backups, and Logs
Time Machine local snapshots can consume 10GB to 50GB or more of System Data space. macOS automatically creates these snapshots periodically and retains them until your Time Machine backup drive is connected, at which point the snapshots are transferred and the local copies are deleted. If your backup drive is not connected frequently, snapshots accumulate and consume significant storage. To manually delete Time Machine local snapshots, open Terminal and type tmutil listlocalsnapshots / to view all local snapshots, then use tmutil deletelocalsnapshots [date] to remove specific snapshots.
Old iOS device backups stored on your Mac can consume 5GB to 50GB each. Navigate to Finder, connect your iOS device, click your device in the sidebar, and click “Manage Backups” to view and delete outdated backups from previously owned devices or redundant backup versions. System log files accumulate in ~/Library/Logs and /var/log and can safely be deleted to recover additional space. For unused language localizations, download and run the free “Monolingual” utility to remove language packs you will never use, potentially recovering 1 to 3GB of space.
Related Mac Storage and Performance Guides
Optimize your entire Mac experience: clear RAM for better speed, defragment your Mac storage, learn how long your MacBook should last, and discover Mac Mini Apple Silicon capabilities.
Reclaim Your Mac Storage Space
Follow these methods to free up gigabytes of system storage and keep your Mac running at optimal capacity.